A Code-Free Approach to Fine-Tuning Stable Diffusion for Personalized Image Generation
We’re witnessing an AI revolution. The ability of AI models to generate personalized images is not only impressive but has vast potential applications. These AI models can not only generate images but also generate images that are intimately tied to specific objects and styles, such as portraying a person or emulating a distinctive art style.
Consider some scenarios.
- Imagine you are an anime artist seeking inspiration. You wish to employ image AI to generate images that not only spark creativity but also align with your unique artistic style.
- You are a marketing manager. You want to use AI to generate advertising images for your products. The generated images should be consistent with the company values and the product styles.
In both scenarios, the base AI model lacks knowledge of your specific style preferences. Training a personalized image AI model is needed.
In this blog, I will introduce the methodologies and tools to fine-tune stable diffusion models (an image generation model) for personalized use cases. I will also share my experience and insights of training using my own photos. This approach demonstrates how AI can be tailored to meet personalized needs.
Training Technique Overview
To finetune the stable diffusion models, we usually feed the models a set of reference images of the target subject. The model is trained to link a particular term with this subject. Then, when we include the subject within the text prompt (the model’s input), the resulting images will maintain the target subject, e.g. a specific individual or a distinctive art style.
There are three famous techniques: Dreambooth, Textual Inversion, and LoRA. DreamBooth adjusts model weights for specific styles or subjects, while Textual Inversion creates new embeddings related to provided terms. LoRA is a quicker and smaller method that adds new weights to the model.
DreamBooth
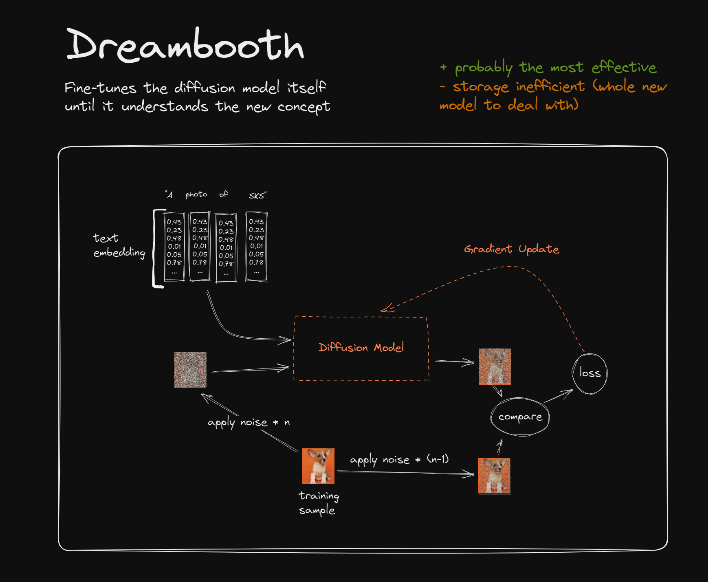
With DreamBooth, an entirely new version of the stable diffusion model is trained, updating all parameters within the model. This process results in a large model checkpoint, typically around 5GB. Unlike Textual Inversion and LoRA, this DreamBooth checkpoint functions as a standalone model capable of independently generating images.
Note that to train DreamBooth for stable diffusion, we need a significant amount of VRAM. The VRAM requirement depends on various factors like the model size, batch size, and resolution of images being used, but typically we need 16GB or more. In my experiment, I ran out of VRAM on a 15GB T4 GPU.
Textual Inversion
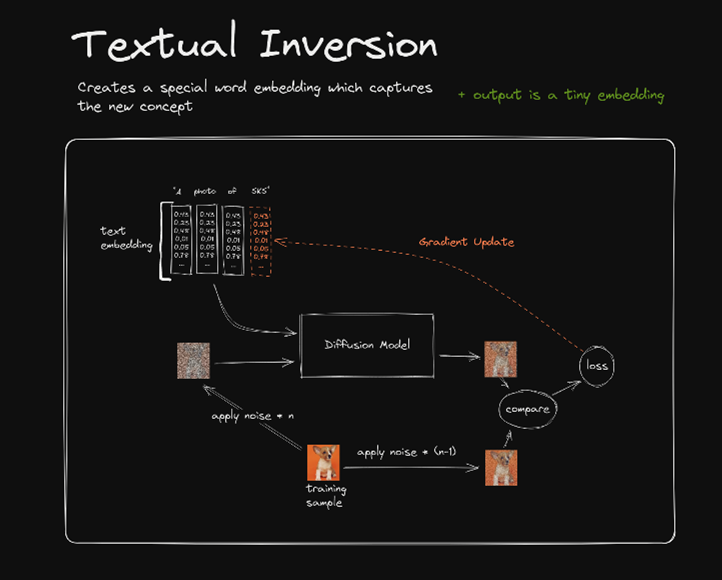
Unlike DreamBooth, the Textual Inversion does not modify the base model. Instead, it creates new embeddings for special words. During training, the embeddings are updated while the stable diffusion base model is frozen. Usually, we set the desired subjects to the special words. So, after training, when we call the special words in the text prompt, the new embeddings are invoked and passed to the stable diffusion model, and the stable diffusion model will generate the images that are associated with the desired subjects.
Unlike DreamBooth, the Textual Inversion is very fast because only a few embeddings are trained. The resulting file is very small, usually a few KB.
Low-Rank Adaptation (LoRA)
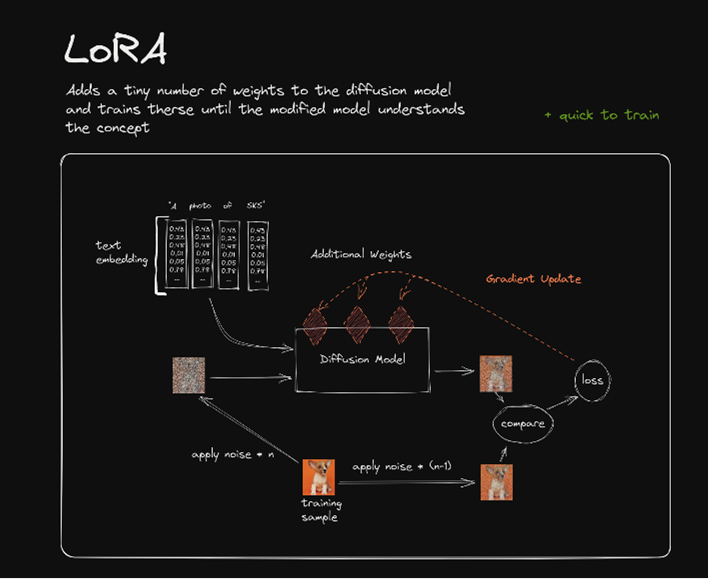
The LoRA method was originally developed for Large Language Models but also works well for stable diffusion models. LoRA does not change the weights in the base model directly. Instead, it adds sparse weight matrices to the base model to form the new dense weights. To make the training fast and compact, LoRA uses matrix decomposition methods.
Basically, a large sparse matrix can be decomposed into two low-dimensional matrices. Instead of updating the entire model with huge matrices, LoRA uses small matrices (red squares) to represent the added weight matrices of high dimensions. Thus, LoRA only needs very limited computation resources and storage space. Usually, the LoRA files are around 200MB.
Hands-on
There are a lot of tools to train and run stable diffusion models. I highly recommend using Khoya (https://github.com/bmaltais/kohya_ss) to train your personalized model and run it on Automatic1111 web UI (https://github.com/AUTOMATIC1111/stable-diffusion-webui). We can follow the instructions on their GitHub pages to install the package.
In my experiment, I will use my own photos to fine-tune a stable diffusion 1.5 model. Then, when I include my name within the text prompt, the model is supposed to present my portrait.
Dataset Preparation
The first step is to collect training images. In my experiment, I collected 20 photos of my face. Typically, 15 photos are good enough. Stable diffusion models require images of 512*512 for training, but the Khoya will process the images with different resolutions.
Note that it is very important to have your target subject occupy a substantial portion of the image. For example, in my case, my face should cover at least 50% of the training photos. In the experiment, if the subject, like a face, only occupies a small area of the training photos, the quality of the output from the fine-tuned model will be significantly compromised.
Create Captions
We need to provide a caption for each image. They must be a text file with the same name as an image containing the caption. We will generate the captions automatically using the captioning tool in the Kohya.
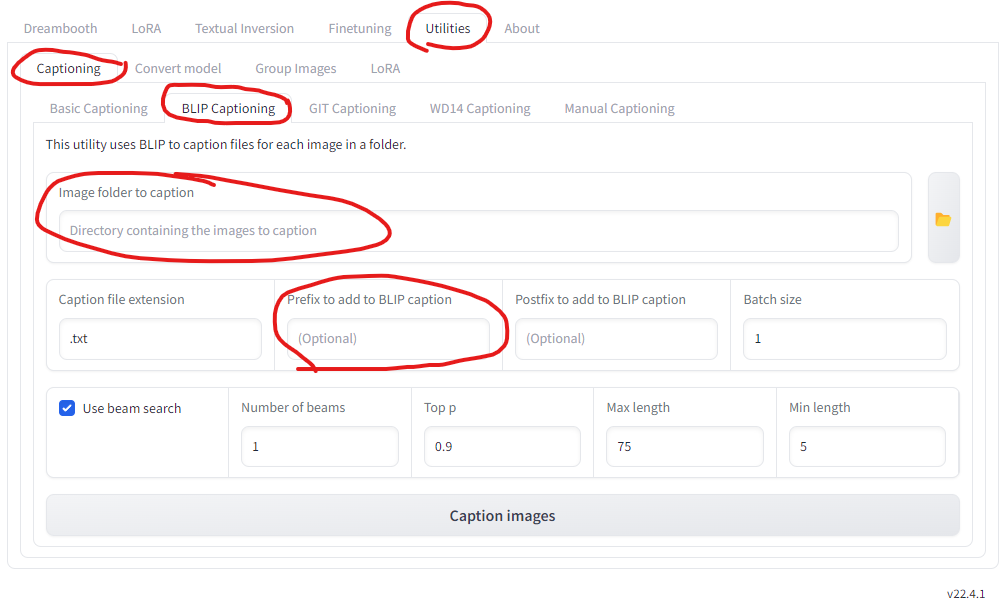
- In the Kohya GUI, go to Utilities -> Caption -> BLIP Captioning. Try any other captioning options if you like.
- Set the path to the training images.
- Set the prefix to the caption. It must contain the special word that we want to use in the prompt. In my case, I will set the prefix to “Photo of Shaodong”, where Shaodong is my special word.
- Adjust other parameters if you like.
- Caption images
Once the captioning is done, each image will have a corresponding caption saved as a .txt file in the same directory. The captions have the same file name as their respective images.
Model Training
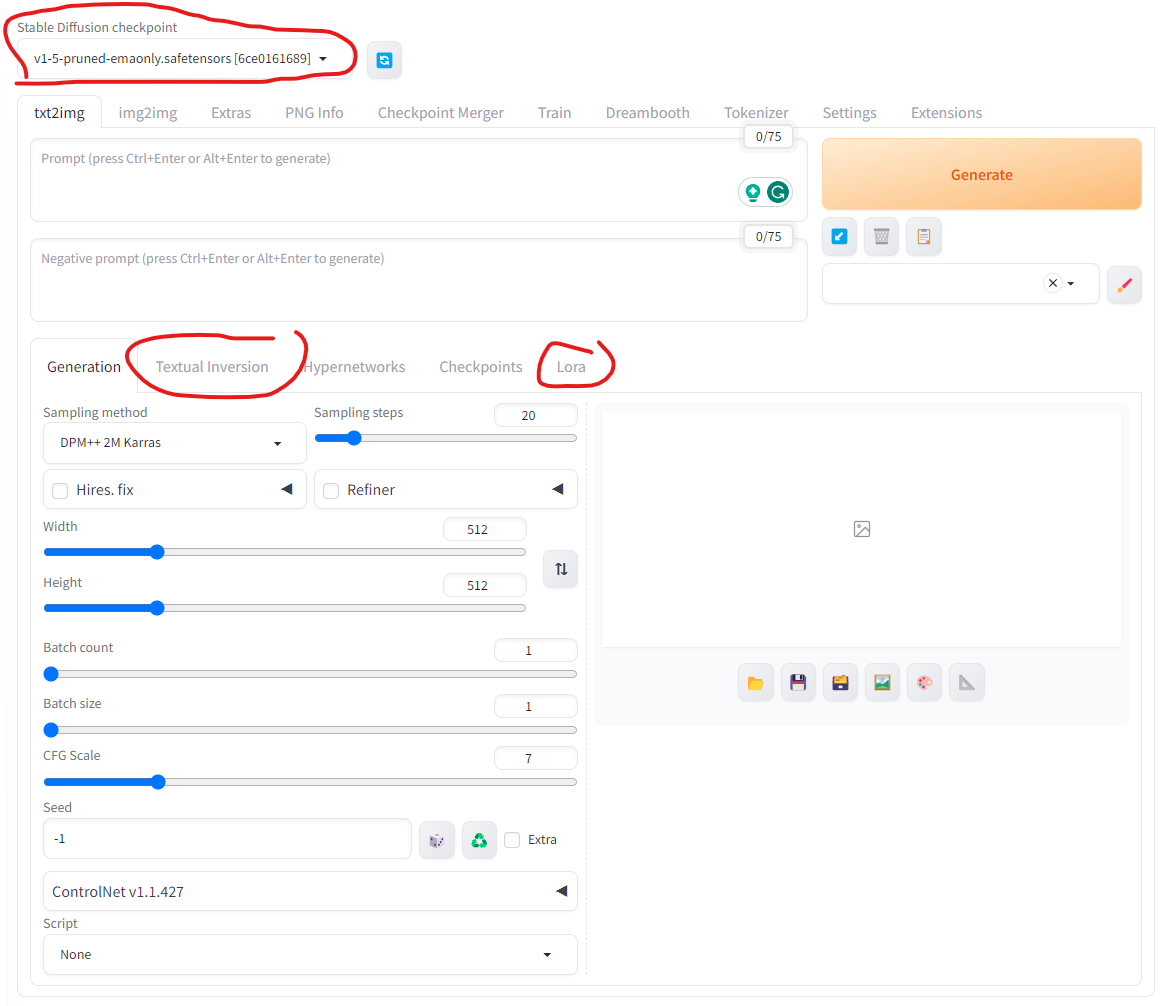
In Khoya GUI, the pages of Dreambooth, LoRA, and Textual Inversion look pretty similar. We can simply start the three training techniques by setting the 1) source model, 2) folders, and 3) parameters.

The source model is the base stable diffusion model that we are going to fine-tune. Here, I selected stable-diffusion-v1.5, but SD 2.1 and SDXL are also available. If you would like to train on a custom model, select the custom in the Model Quick Pick box and set the directory of your custom model. Civitai (https://civitai.com/models) is a good place to find an interesting stable diffusion model.
For LoRA, my experience suggests that using the base stable-diffusion-v1-5 model from runwayml (which is the default) yields results that are most effectively applicable to other derivative models. This approach seems to offer the best transferability of learned features.
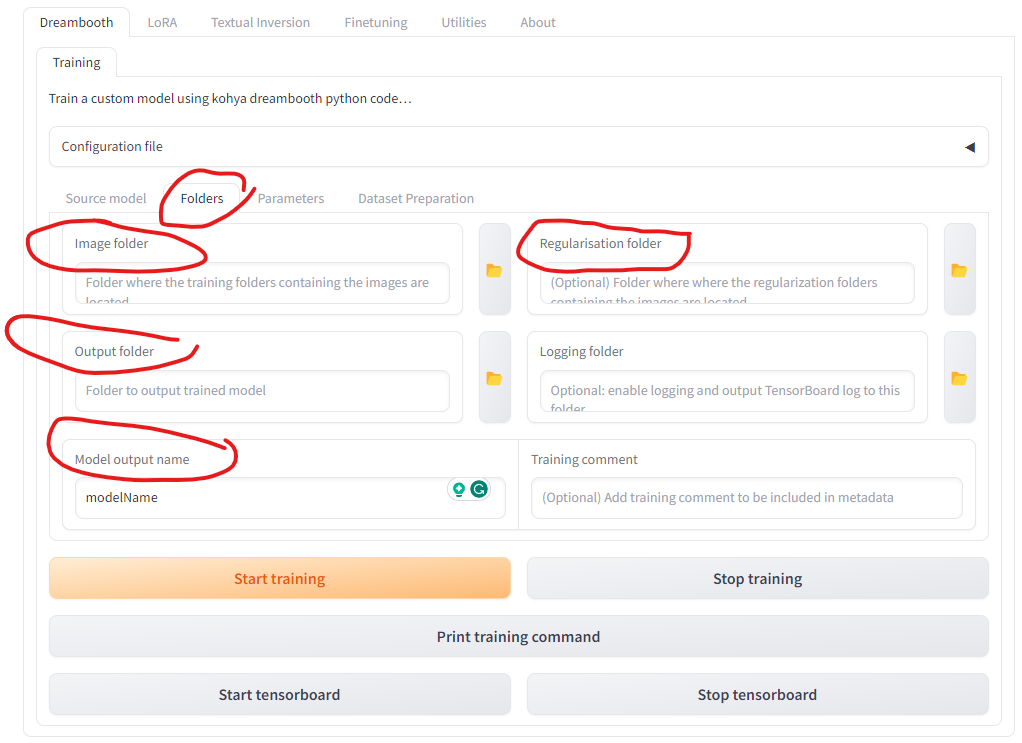
In the folder tab, the image folder is the directory of the training images. The output folder is the directory to output the trained model. Optionally, we can save the regularization pictures in the regularization folder. The regularization images are used to maintain the general capabilities of the original model while it is being fine-tuned for a specific task. These images serve as a reference point to prevent the model from deviating too far from its original functionality. In my experiment, I didn’t see any improvement when I set the regularization folder.
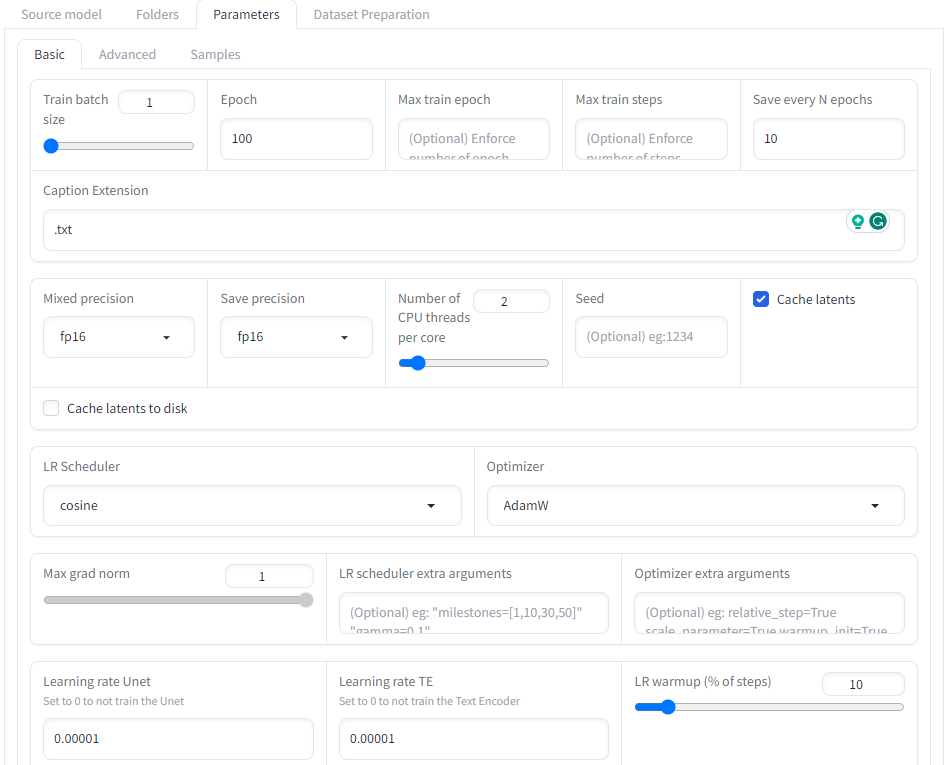
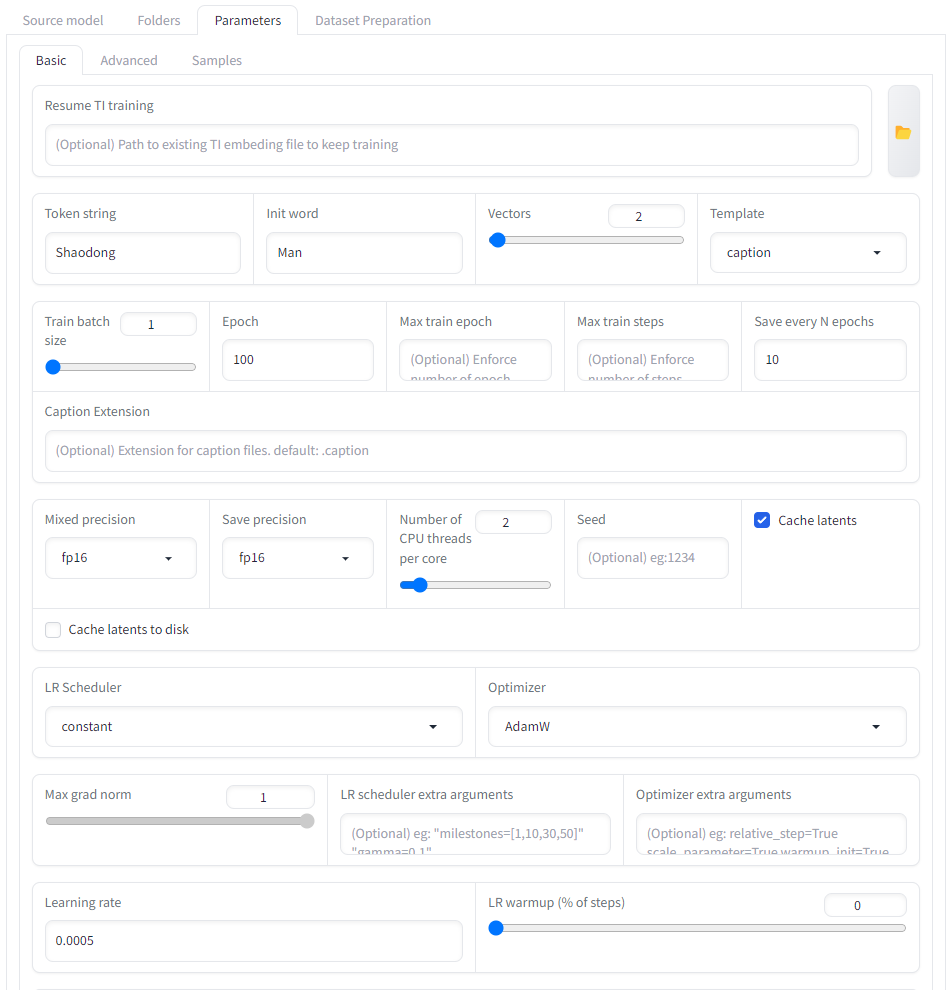
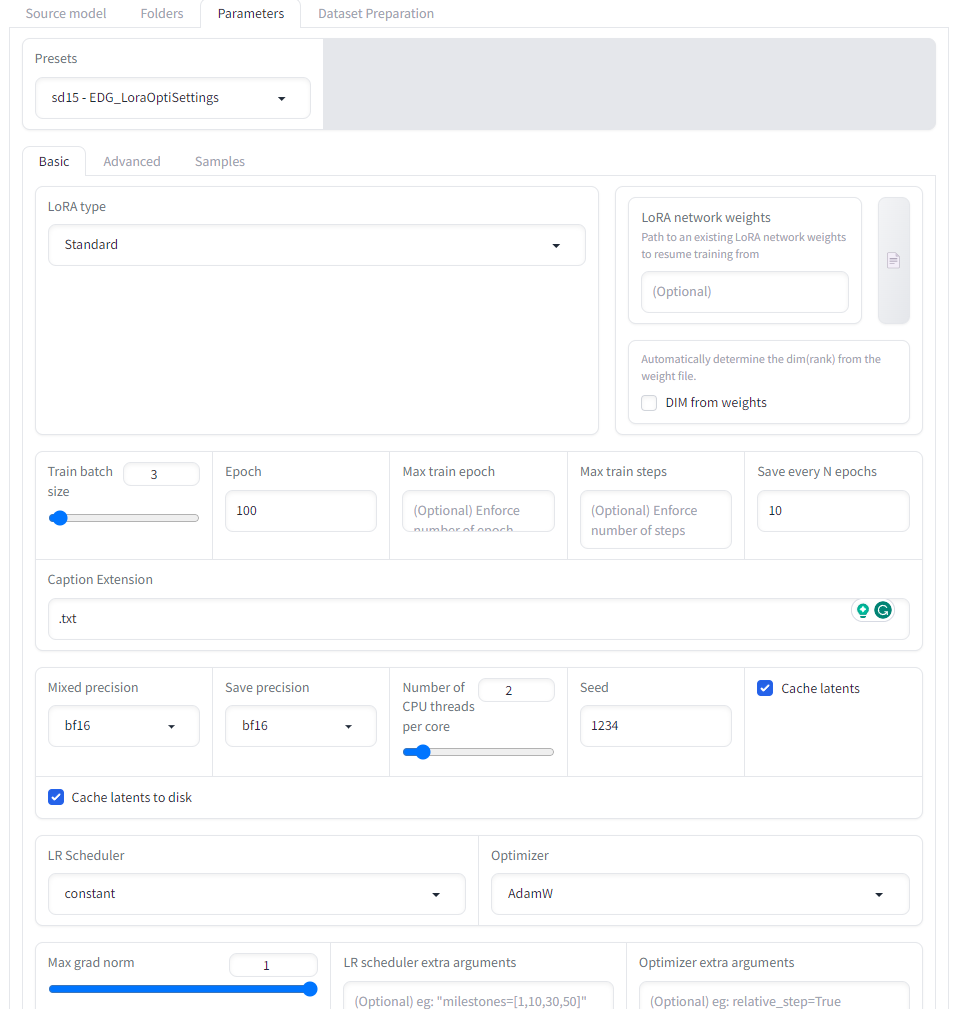
In the parameters tab, we set up the parameters for the training. We can use the default parameters or adjust them accordingly. The screenshots above show the parameters I used in DreamBooth, LoRA, and Textual Inversion.
- If your GPU does not support bp16 mix precision, please select fp16 in the mixed precision & save precision, and select AdamW as the optimizer. For me, this step is essential to start training on a T4 GPU in Google Colab.
- To avoid exceeding VRAM capacity, keep the training batch size small. I set mine to 1.
- For the LoRA training, we can select proper presets from the presets box. In my case, I selected sd15-EDG_LoraOptiSettings, but other presets are available for different LoRA variations..
- In the Textual Inversion, it’s very important to set the “token string” to our special words. It will trigger the added embedding, when we include it in the text prompt. In my case, it’s my name.
- In the Textual Inversion, the “init word” plays a key role. It initializes the embeddings for the “token string”. A well-chosen “init word” can make the model converge fast. The “init word” should broadly describe the target subject at a higher level. In my case, I set it to “man”.
- The “vectors” in the Textual inversion determines the number of embeddings to represent the selected “token string”. In the paper of Textual Inversion (https://doi.org/10.48550/arXiv.2208.01618), the author only experimented on small numbers (1 - 3). I suggest keeping the same.
Use Models
After training, we can copy the training output to automatic1111 stable diffusion web UI to generate the target results.
- Dreambooth: copy the model file (.safetensors) to sd/models/Stable-diffusion in the stable diffusion web UI
- LoRA: copy the lora file (.safetensors) to sd/models/Lora
- Textual Inversion: copy the embedding file (.safetensors) to sd/models/embeddings
Then open the automatic1111 stable diffusion web UI, following the instructions in https://github.com/AUTOMATIC1111/stable-diffusion-webui.
To generate images using the Dreambooth model, we need to select the trained model in the checkpoint box. Then we put the special words in the text prompt (e.g. my name in my case) and click the “generate” button.
To generate images using the Textual Inversion, we can either click the box in the “Textual Inversion” tab, or manually include the file name of the saved embedding file.
To generate images using the LoRA model, we can also click the box in the “Lora” tab, or manually input special_words <lora:lora_model_file_name:1> in the prompt. The 1 is the weight in the prompt. Higher weight will bring the images more targeted features.
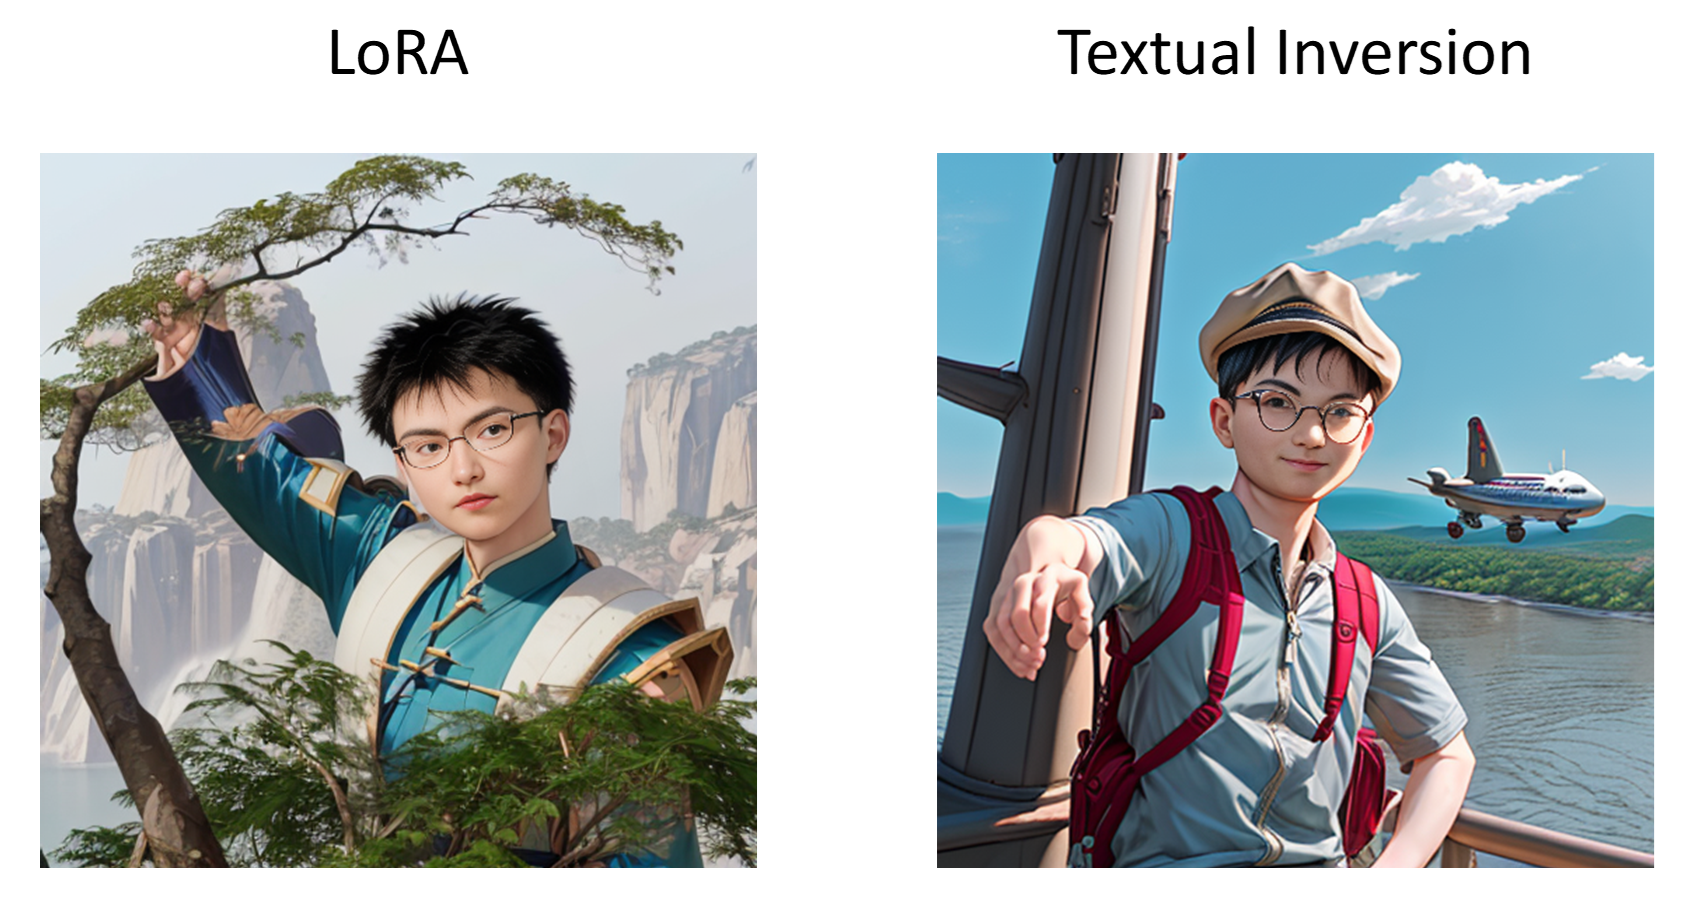
In my experiment, I didn’t train the Dreambooth model due to the VRAM limitations. I trained the Textual Inversion and LoRA models. The following are the generated images.

The generated images are not perfect but very close already. The facial contours are very similar to those in the training images. And both LoRA and Textual Inversion have captured the essence of my eyebrows, which are short and light-colored.
More interestingly, I found that I could dictate the accessories in the generated image by adjusting the prompt. For instance, adding “wearing a hat” or “glasses” to the prompt leads the model to produce images featuring these accessories. This requires explicitly mentioning “glasses” and “hat” in the training image captions. Note that I always wore glasses in the training images. Thus, omitting “glasses” from the captions might make the model automatically associate my name with a glasses-wearing face. Then it would be difficult to “take off” the glasses. So the interesting point is that, to exclude a feature from the target subject in the generated images, we actually need to specifically include that feature in the training captions.
Another interesting finding is that the trained embeddings and LoRA models are translatable. We use the same embeddings and LoRA models on a different base model. Here I changed the base model to realcartoon3d_v13 (found in https://civitai.com/models), which generate cartoon style images. The following are the generated images with my name in the prompt.
References
- https://github.com/AUTOMATIC1111/stable-diffusion-webui
- https://github.com/bmaltais/kohya_ss
- https://octo.ai/blog/the-beginners-guide-to-fine-tuning-stable-diffusion/
- https://civitai.com/articles/618/tutorial-kohya-ss-dreambooth-ti-textual-inversion-embedding-creation
- https://civitai.com/models